Editor mode
Pulse Water is a mode of the level editor, like Landscape and Foliage: the water work of a level in one place. Open it in the mode selection of the level editor toolbar, with the console command Pulse.Mode PulseWater [Ocean|Probe|Lake|River|Terrain|Fluid], or with the fix of the setup step Place the ocean in the Pulse Water mode in the Pulse window. The tools sit on the left with their settings below them; the viewport shows labels and handles, and the time bar at its bottom runs the water without Play. When the level has no ocean, the mode starts on the Ocean tool, otherwise on the Probe. The views in the Pulse menu of the viewport show what the water queries see, also without the mode.
Ocean
- Place Ocean adds the ocean of the level at the origin and selects it (one undo step); Select Ocean selects it.
- Wave Set and Sea Level change the ocean of the level, one undo step per change (dragging a slider is one step). The sea level shows as a label at the ocean.
Calm or rough water for the editor only is the Sea State of the time bar.
Probe
The probe reads the water at a point like a water query: height of the surface, depth down to the ground, current (speed and compass direction; X is north, Y east), liquid, source (ocean, lake or river) and status (water, no water, covered by terrain, not loaded).
- Move the mouse over the water and the probe follows it (Follow Mouse). A click places it; drag it to move it.
- Pin Probe keeps the probe in the level. Pinned probes are kept per level in your editor preferences (Editor Preferences > Pulse > Water), stay as labels whatever tool is active and show in every PIE window (the viewport view Probes): there each window shows the height of its own world, and client windows the height on the server next to it at the same water time, red when they differ by more than a centimeter.
- Unpin Selected removes the pinned probe selected in the viewport, Clear Pins all of them.
Lake
The Lake tool floods a depression of the ground and turns the water into a lake, so the shore follows the terrain without placing spline points by hand.
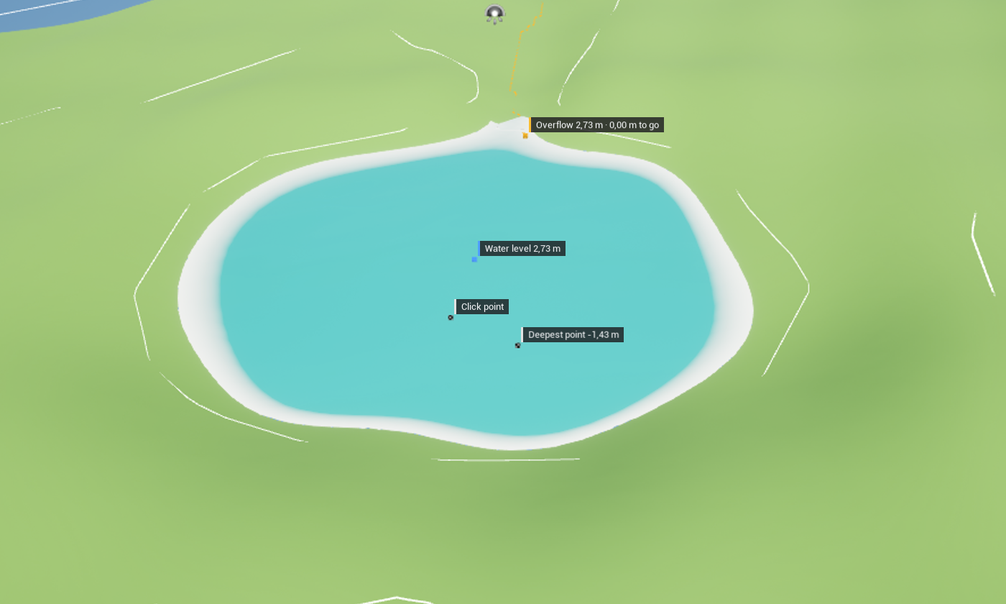
- Click into a depression. The tool samples the ground around the click into a height raster (the terrain provider of the water; without one the static world geometry below) and lets the water rise from the bottom of the depression: every cell below the water level that is connected to the bottom, not the valley behind the rim. The water stands just below the first overflow above the clicked ground. A temporary lake shows the water as it will look; it is no part of the level.
- Water Level sets the height of the water. Drag the arrow in the viewport, or turn the mouse wheel over the water (50 cm per step, 10 cm with Shift); elsewhere the wheel moves the camera as usual. Water shows area and volume, Depth the deepest water and the lowest ground, and the viewport marks the click point and the deepest point.
- Overflow is the lowest point of the rim: the highest level at which nothing runs out. Height shows it with the distance to the water, Place the side of the lake and where the water would go (to the sea, into a lake, into a depression below or down the valley). The viewport marks it and draws the way the water would run as a dashed line. Fill to Overflow raises the water exactly to it. Higher water runs over the rim into the ground behind it; when that fills up too, the next overflow is the rim of the bigger water.
- Outflow as River creates a river from the overflow along that way (one undo step). Its surface starts at the height of the overflow and then lies 30 cm above the ground; set its width, depth and speed in its details.
- Shore: the outline follows the shore of the water with Outline Points spread evenly along it, Smoothing rounds it, and Shore Overlap moves it into the ground, so the surface ends under the terrain without a gap. Contour Lines show on the ground where the water would stand 1 m and 5 m higher.
- Create Lake makes a normal Pulse Water Lake with the outline as its spline at the water level (one undo step) and selects it; move its spline points or change it in the details like any lake. Cancel drops the water. A click into the water that is already there only moves the click point and keeps the level.
- Sampling: Cell Size of the raster (1 m by default; smaller cells follow the shore more closely and take longer) and Search Radius around the click (100 m). The area grows, up to 1024 cells per side, while the depression has no rim inside it.
River
The River tool makes a river that follows the terrain and paints its width, depth and speed. Mode decides what a click does:
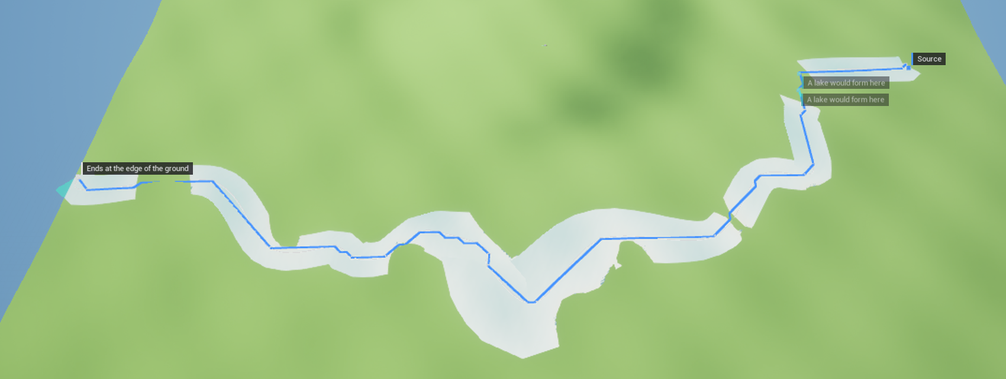
- From Terrain: a click sets the source, and the river runs down the steepest slope of the ground to a lake, the sea or the edge of the ground. Depressions on the way are filled up to where they run over, so the river crosses them; the viewport marks them (“A lake would form here”: flood them with the Lake tool). A drop of at least Waterfall Drop (3 m) from one cell to the next is suggested as a waterfall. Path shows the length, the end and how many points the river gets, On the Way the waterfalls and depressions. Drag the source to trace again. The ground is sampled as for the Lake tool (Cell Size, Search Radius), on from where the river leaves the sampled area, up to Max Length.
- Click Points: every click adds a point of the river on the ground. Drag the points to move them; Remove Last Point takes the last one away.
- Create River makes a normal Pulse Water River with the Section (width, depth, speed) at every point (one undo step): along the traced way, simplified to the points that bend it, with its surface Above Ground over the ground (30 cm), or through the clicked points. Add Waterfalls places a waterfall at every suggested step (one undo step). Clear drops the way and the points.
- Paint: drag over a river (the selected one, else the one under the brush) to paint the Section onto its spline points: Strength in the middle of the brush, less toward its edge (Brush Radius). Paint Width, Paint Depth and Paint Speed choose what the brush changes. One stroke is one undo step.
The surface follows the ground the river was traced on; where the ground rises across the river, the terrain covers the water there.
Terrain
The Terrain tool shapes the ground below a lake or river with its Terrain Shaping: a bed, an embankment, closed banks and paint layers. It works on the selected lake or river; a click on the water of another one chooses that. The target is the ground below the water body that a terrain shaper takes, today a Landscape with the engine plugin Landscape Patch (Shaping a Landscape); the chip next to the name says which, Target names the landscape and its patch layer. Without a target the panel says what is missing.
- Shape shapes the ground now (it replaces the last shape of the body), Commit to Terrain writes the shape into the ground for good, Remove Shape takes it out. Each is one undo step.
- Follow Changes (on): while the tool runs, a change of the water body shapes the ground again when the change ends, in the same undo step as the change: drag a point of the river, change its width or its profile, and the bed follows. Undo takes both back.
- Station puts the cross-section along the river from its source, or along the shore of a lake (inside on the left). Drag its handle in the viewport or click the water.
- Paint: the terrain layer of each paint zone (bed, wet bank, bank, sand, under water), chosen from the layers of the target. They are the project settings (Project Settings > Pulse > Water Terrain) and count for every water body.
- Terrain Shaping of the body: the Terrain Shaping of the lake or river itself (profile, embankment, closed banks, freeboard; the basin of a lake), edited where it lives.
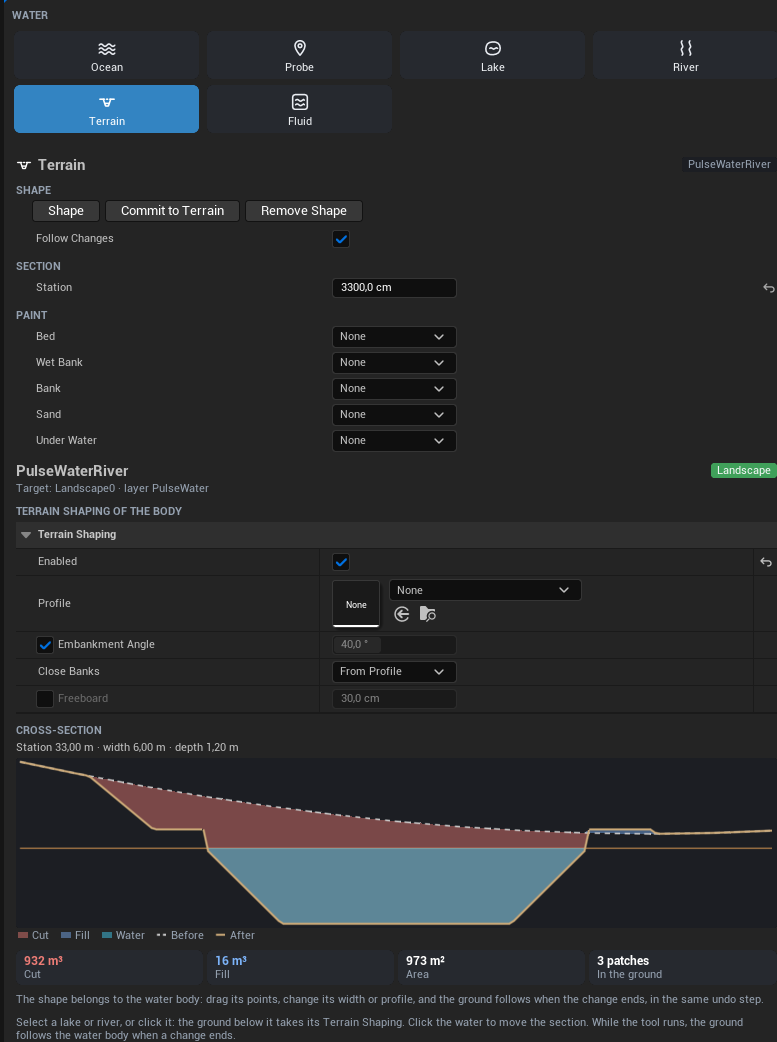
- Cross-section: the ground before (dashed) and after shaping at the station, cut red, fill blue, the water teal and the waterline, as in the profile editor. Below it the cut and fill volume, the area that changes and what lies in the ground (on a Landscape: the number of patches).
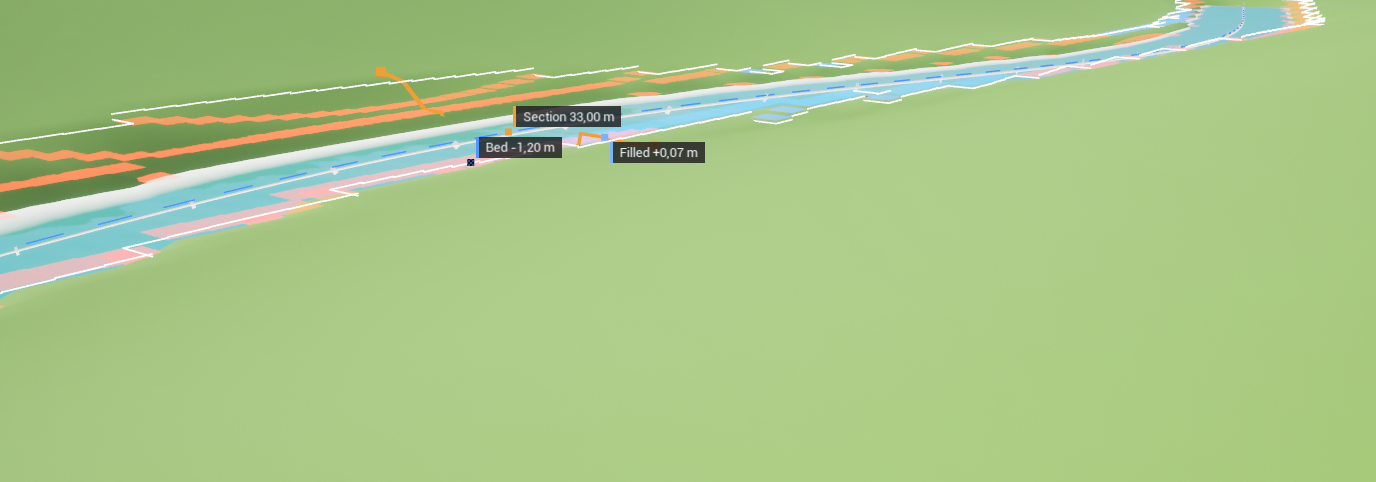
The viewport shows the middle line of the body (dashed), where the shape changes the ground (white edges), the cross-section on the shaped ground with the bed and the largest fill, and the view Terrain Change colors the cut red and the fill blue, stronger for more.
The ground of the panel is read once for a water body (on a Landscape it renders the edit layers below the patch layer), so the section and the volumes follow changes right away.
Fluid
The Fluid tool simulates a fluid volume in the editor, before anything is baked.
- Volume: the tool works on the selected fluid volume, else on the nearest one. New Volume places one of 20 x 20 m where the camera looks (one undo step), Select Volume selects it. Drag a corner on the top of the box to resize it: the opposite corner stays and the grid follows when you let go. Cell Size sets the grid as the details panel does. Rebuild Grid finds the ground and the obstacles again after they moved; moving the volume itself, undo and the details panel rebuild it on their own.
- In and out sums up where the water comes from and where it goes: sources, drains, the start state and the open sides. Add Source and Add Drain place an actor with a source or a drain of 100 l/s in the box where the camera looks. Drag it in the viewport (Shift for up and down) and set its rate and radius in the details panel: the domain reads it at once and the water stays.
- Obstacles lists what the traces found above the ground, the biggest first. Actors of the same mesh (or class) share a row (“Sphere x 3”; the arrow shows each one), with what they are for the water: ground (the water flows over it once it is high enough), wall, water flows under it, or left out. The switch leaves an actor or a whole row out (an obstacle component set to
Ignore, one undo step) and builds the grid again; switched back on, the component follows the rule of the domain. The ground below (terrain or collision) is not in the list. The biggest obstacles carry a label in the viewport. - Timeline at the bottom of the viewport (in place of the time bar while the tool runs): Play, Pause, Step, speed x1, x2 and x4. Click or drag in the tracks to go to a time; an earlier time simulates again from the start (up to 120 s). The track Simulation shows the simulated time and when the water settled: two seconds in a row in which the water, averaged over each second, changed by at most 5 mm on average and its volume by at most 0.2 %. Eddies behind rocks keep moving in a settled river; a pool that still fills does not settle. Drag on the track Loop to mark the span of a loop bake.
- Drop Debris drops 16 pieces on the water where the camera looks. They drift with the current and leave a trail of the last seconds, so eddies and dead water show. Reset puts the water back to its start state and clears them.
- Turn on the views Depth and Flow in the Pulse menu of the viewport to see the water while it runs.
- Bake keeps the water in the bake of the volume (Bake Asset; without one the tool makes
FB_<volume>next to the level). KindStationarykeeps the water at the playhead (at 0 s: once it settled);Loopkeeps the span of the Loop track with Frames Per Second frames per second. Before baking, the panel says what the bake keeps and how much memory it needs; the timeline shows the seam of the loop span, how much the water at its end differs from its start, once the simulation got past its end (a loop over water that has not settled jumps). The bake runs in the background with its progress in a notification and the status bar and can be cancelled; it simulates from the start state in the same steps as the timeline, so it keeps exactly what the timeline showed. The result goes into the asset as one undo step; save the asset. Afterwards the view Bake Difference compares the bake with the live water at the time of the timeline, and a double click on the asset opens it in the bake editor. - Bake Flow turns a river (Pulse Water River, the selected one or the one the camera looks at) into baked fluid: it places fluid volumes along it, each at most Volume Length long and as wide as the river plus room for its banks, also where it bends, with cells of Cell Size. The upstream side of each volume stands at the level of the river there and its downstream side at the level where it ends, so the water runs down the river around the rocks; the banks of the level hold it. The volumes answer the water queries above the river and its own surface hides (Hide River Surface). Each volume is baked in the background into a new bake asset next to the level once its water settled; save the assets afterwards. All volumes are one undo step.
- Out of date: when the ground, an obstacle, a source or drain or a setting changes after the bake, the volume is marked yellow (“bake out of date”), also while another tool of the mode runs, and the panel says so. The Pulse Check reports it with the fix Bake Again (Check).
The simulation of the tool runs in the editor world only. Leaving the tool shows the bake of a Baked volume again.
Water time
The water of the level editor has a water time of its own: waves and currents run in the editor without Play, and the time bar at the bottom of the viewport controls it, whatever tool is active.

- Rewind, Play and Pause, Step (a tenth of a second, more at higher speeds).
- Water time: the time as minutes and seconds. Click it and type a time to jump there: seconds (
12.4), minutes and seconds (1:15.3) or hours (1:02:03). - The slider moves the time within the current minute (an hour at x60) and pauses.
- Speed x1, x10 and x60: fast water time for slow changes such as tides.
- Sea State: As in game uses the sea state of the environment; a preview (Flat, Calm, As authored, Rough, Storm or any value) shows calm or rough water instead, for the ocean, its materials and the water queries of the editor.
The same water time and sea state always give the same water: pause, type the time and pick the sea state to get a still again, for screenshots (HighResShot) or to compare two versions of a level. Probes read the water at the time of the bar.
The water time and the sea state of the editor are never saved and never reach PIE or a game: Play uses the water time of the server and the sea state of the environment. Closing the mode runs the water as normal again (playing at x1, sea state as in game). The bar hides while Play in Editor runs.
Views
The Pulse menu in the toolbar of the level viewport, and of every PIE window, shows what the water queries see, right on the water. Several views can be on at once; every viewport keeps its own.
| View | What it shows |
|---|---|
| Depth | The depth of the water down to the ground: shallow water light, deep water dark, purple where there is no ground below. |
| Source | Where the water comes from: ocean, lake or river, with the name of each water body. |
| Flow | How fast the water flows, from blue (still) over green (1.2 m/s) to red (2.4 m/s and faster), with arrows in the direction of the current. |
| Bake Difference | Level viewports, while the Fluid tool simulates a volume that has a bake: how far the surface of the bake is from the live water at the same time, green below 5 mm, red from 5 cm, purple where only one of them has water. |
| Terrain Cover | Where terrain hides the ocean: terrain in the band above the sea level orange, the top of the band as a yellow line where terrain rises out of it, the ocean that stays visible teal. Under a rock arch whose top is above the band the water stays. |
| Terrain Change | Level viewports, while the Terrain tool works on a lake or river: what its shape does to the ground below it, cut red and fill blue, stronger for more (full at 2 m). |
| Network | The cells that send ring waves to the clients (256 m by default): on a server every cell with its waves and how far clients get them, on a client the cells it gets. |
| Probes | The pinned probes, in PIE windows (Probe). |
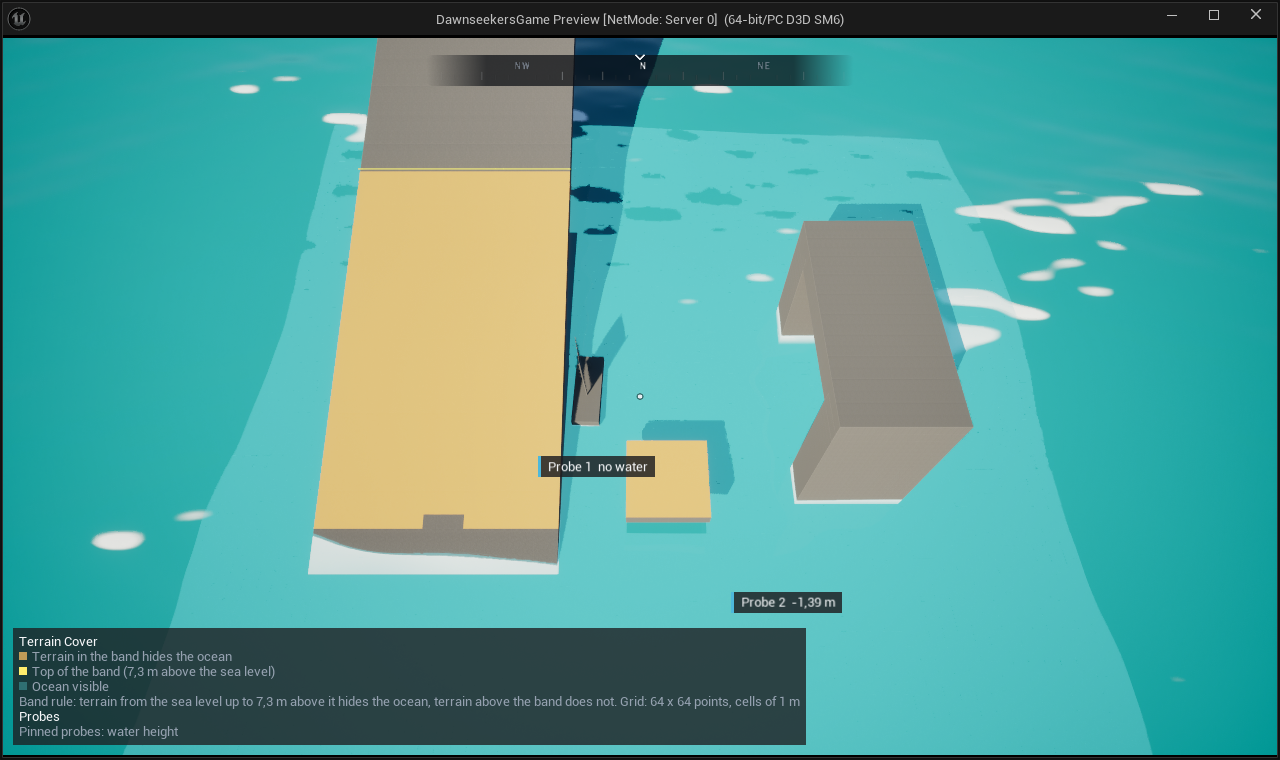
The water views query a grid of 64 x 64 points around what the camera looks at, with cells of about a fortieth of the distance (50 cm up to 256 m), and lie on the waves. They change neither the water nor its materials: they show what boats, swimmers and scripts get from QueryWater. When a view is on, a grid that comes into view costs a few milliseconds once; after that a view costs about a millisecond every 0.05 s, because it keeps its cells, moves them with the waves and queries the rest again a part at a time (performance).
In the console: Pulse.Views PulseWater.Depth on, likewise PulseWater.Source, PulseWater.Flow, PulseWater.BakeDiff, PulseWater.TerrainCover, PulseWater.TerrainChange, PulseWater.Network and PulseWater.Probes; typed in a PIE window, for that window.
Footer
The footer estimates what the water of the level costs per frame on the game thread: floating objects by their pontoons, boats and environment zones, with the numbers of the performance page. The bar compares the estimate with the budget of the editor preferences (1 ms by default) and turns orange above it. The footer also counts water bodies, floating objects and boats and shows the quality level of the water.
Scripts
Everything the mode does is a function of UPulseWaterEditorLibrary, for Python and Editor Utility Blueprints. Every change is one undo step.
| Function | What it does |
|---|---|
OpenWaterMode(Tool) | Opens the mode, on a tool (Ocean, Probe, Lake, River, Terrain, Fluid) |
GetOcean(bPlace) | The ocean of the open level; places one if asked |
SetOcean(WaveSet, SeaLevel) | Waves and sea level of the ocean, placing it first if needed |
SetPreviewSeaState(SeaStateScale), GetPreviewSeaState | The sea state of the editor; a negative value is “As in game” |
SetEditorWaterTime(Seconds), GetEditorWaterTime | The water time of the editor |
SetEditorWaterTimePlayback(bPlaying, Speed), IsEditorWaterTimePlaying, GetEditorWaterTimeSpeed | Play or pause it and set its speed (a negative speed keeps it) |
QueryProbe(Location), FormatProbe(Result) | The water at a point and the lines of its label |
GetPinnedProbes, PinProbe, UnpinProbe, ClearPinnedProbes | Pinned probes of the open level |
PlaceFluidVolume(Location), SetFluidToolVolume(Volume), GetFluidToolVolume | The fluid volume of the Fluid tool (these open it) |
AddFluidSourceOrDrain(Location, bDrain) | A source or a drain in its box |
SetFluidSimulation(bPlaying, Time), GetFluidSimulationTime(SettledTime) | Play, pause or seek its simulation (a negative time keeps it); when it settled |
DropFluidDebris(Location, Count) | Debris on its water |
SetFluidLoopSpan(Start, End) | The span of its Loop track |
StartFluidBake(bLoop, FramesPerSecond), IsFluidBakeRunning(Progress) | Bake its volume in the background, as its Bake button does |
BakeRiverFlow(River, VolumeLength, CellSize, bHideRiverSurface) | Bake Flow on a river |
PlaceRiverFlowVolumes(River, VolumeLength, CellSize, bHideRiverSurface) | Only place the volumes of Bake Flow, to bake them later |
FloodLake(Location) | Floods the depression at a point with the Lake tool (opens it), like a click |
SetLakeWaterLevel(WaterLevel), FillLakeToOverflow | Its water level; up to the overflow |
GetLakeFlood | Its water: level, area, volume, depth, deepest point, overflow, the way of the outflow and the outline |
CreateLakeFromFlood, CreateLakeOutflowRiver, CancelLakeFlood | Create Lake, Outflow as River and Cancel |
TraceRiverFrom(Source), GetRiverToolPath | The way of the River tool from a source (opens it): points, end, waterfalls, depressions, length |
AddRiverToolPoint(Location) | A point of the River tool, like a click in Click Points |
CreateRiverFromTool(Width, Depth, FlowSpeed), AddRiverToolWaterfalls | Create River and Add Waterfalls |
PaintRiverSection(River, Location, Radius, Width, Depth, FlowSpeed) | One dab of the brush at full strength (one undo step) |
ShapeTerrain(Body), RemoveTerrainShape(Body), CommitTerrainShape(Body) | Terrain shaping of a lake or river on the ground below it: apply (replaces the last shape), take back, commit; each returns why it did not work |
GetTerrainVolumes(Body) | Cut, fill and area of its shape on the ground before shaping |
SetTerrainToolSection(Body, Station) | Opens the Terrain tool on a lake or river with the section at a station |
With Landscape Patch enabled, UPulseWaterLandscapeLibrary adds CreateTestLandscape(Corner, Heights, PaintLayers, LayerInfoFolder, Components, QuadSize) (a small landscape to try terrain shaping, flat or from heights, with paint layers; the first covers the ground; their layer info assets go into the folder, or next to the level as in the Landscape mode) and GetTerrainPatchCount(Body).
import unreal

lib = unreal.PulseWaterEditorLibrary
lib.set_ocean(None, 120.0)

# A still: paused at 12.4 s with a rough sea
lib.set_editor_water_time_playback(False)
lib.set_editor_water_time(12.4)
lib.set_preview_sea_state(2.0)
for line in lib.format_probe(lib.query_probe(unreal.Vector(1000.0, 0.0, 0.0))):
    print(line)

# A lake in the depression at a point, filled up to its overflow, with its outflow as a river
if lib.flood_lake(unreal.Vector(3000.0, -2000.0, 0.0)):
    lib.fill_lake_to_overflow()
    flood = lib.get_lake_flood()
    print(flood.area / 10000.0, 'm2', flood.outflow_end)
    lib.create_lake_outflow_river()
    lib.create_lake_from_flood()