Skill tree editor
Double click a Skill Tree asset to open it in the skill tree editor. It is built on the Pulse Editor Kit of PulseFoundation, so it works like the other Pulse asset editors:
- Graph (left): the skills as nodes and their prerequisites, comment boxes and a minimap;
- Validation and Notes (below the graph);
- Overview (right, top): size and cost of the tree, the path to the selected skill;
- Details (right, bottom): the tree, or the selected skills.
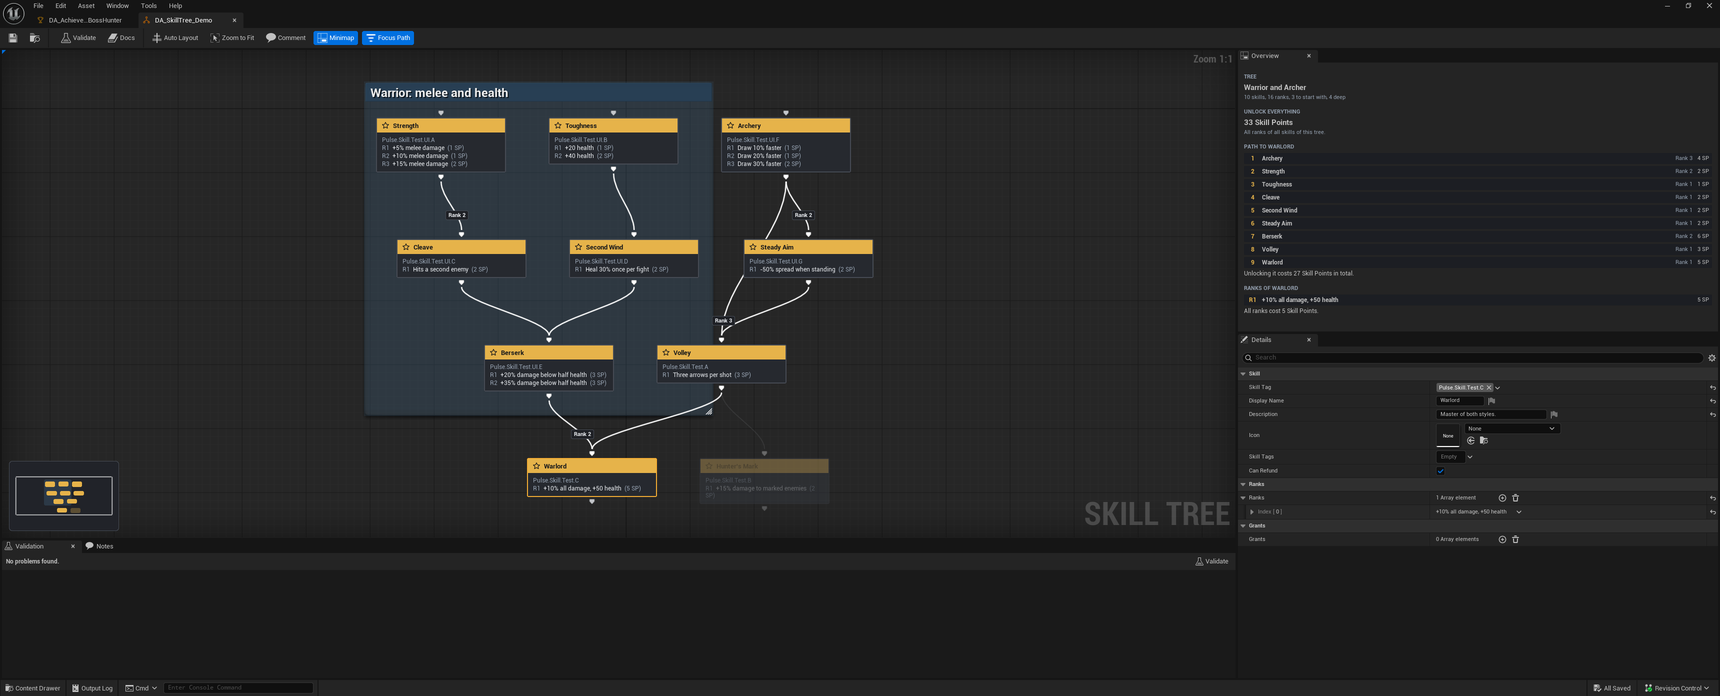
The graph is only a view of the tree. Everything you do in it is written to the tree asset right away (Nodes: skills, prerequisites and EditorPosition; comment boxes), with undo. Changes you make in the details panel, and undo/redo, show up in the graph as well.
Skill nodes
Each node is one skill:
- header with the icon of the skill (or the skill class icon) and its name, in the color of its role (the flat graph look of the editor kit): skills without a prerequisite start the tree (blue), skills that nothing needs end it (purple), the ones between are gray;
- the
SkillTag; - one line per rank:
R1,R2, … with the rank description and its cost (SP= skill points of the default pool, other pools by the last part of their tag); skills with more than four ranks show three and “+ N more ranks”; - the grants of the skill after
+(a grant without description, e.g. a tag grant without tags, shows as “(empty)”).
The triangle on top is the Requires pin, the triangle at the bottom the Unlocks pin; pins and links are drawn in the skill color (gold), filled when linked. The selected skill has a gold outline; skills with problems get a red (error) or orange (warning) outline and an icon next to the name; hover the node for the message.
Adding skills
| How | What happens |
|---|---|
| Drag Skill Definitions from the Content Browser into the graph | They are added where you drop them. Skills that are already in the tree are skipped. |
| Right click > Add Skill > name | Lists all Skill Definitions of the project that are not in the tree yet (with search). |
| Right click > Create New Skill… | Asks for a name and folder (default: next to the tree), creates the asset and adds it. |
If you open the menu by dragging from a pin, the new skill is connected to it: from the bottom of a skill, the new skill needs it; from the top, the new skill is needed by it.
A skill can only be in a tree once. Delete (or right click > Remove from Tree) removes the skill and its connections from the tree; the skill asset stays. Double click a node to open the skill asset.
Connections (prerequisites)
Drag from the bottom of a skill to the top of another: the lower skill now needs the upper one. The connection is stored in the prerequisites of the lower skill’s node, by the upper skill’s tag.
The editor refuses connections that would not work:
- a skill that needs itself,
- two connections between the same skills,
- cycles (A needs B needs A),
- skills without a
SkillTagas prerequisite.
When several connections leave or reach the same skill, they are spread over its bar in the order of the skills at their other end, so they do not lie on top of each other.
Required rank
A new connection needs rank 1. To need a higher rank:
- right click the pin (or the node) and pick Required Rank of … > Rank N, or
- double click the connection: the rank goes up by one, and back to 1 after the highest rank.
Connections that need more than rank 1 show Rank N just above their arrow.
Right click a pin to remove single connections, or use Alt + click as in every graph.
Comments
Press C or click Comment on the toolbar to put a comment box around the selected skills (or at the mouse position if nothing is selected); right click > Add Comment works too. Double click the title to rename it. Moving a comment moves the skills inside it. Comments are saved in the tree asset as editor-only data, so they are not cooked. Select a comment to change its color and font size in the details panel.
Focus path
With Focus Path on (toolbar, default), selecting a skill highlights it and every skill it needs, directly or through other skills; all other skills and their connections are dimmed. Click empty space to see the whole tree again.
Overview
| Section | Content |
|---|---|
| Tree | Name, number of skills and ranks, skills without prerequisites, length of the longest chain |
| Unlock everything | Cost of all ranks of all skills, per skill point pool; other costs are listed by their description |
| Path to … | For the selected skill: every skill it needs with the highest rank any skill on the way needs, prerequisites first, and what unlocking all of them costs |
| Ranks of … | The ranks of the selected skill with their cost |
Validation
The editor validates the tree and all its skills when it opens and after every change. The Validation tab lists the problems (IsDataValid of the tree and the skills, prerequisites that are not in the tree, required ranks a skill does not have). Click a problem to jump to its skill. Validate on the toolbar runs it again and shows the tab.
Notes
The Notes tab is free text for the tree (ideas, open points, balancing notes). It is saved with the asset in the editor and not cooked.
Details panel
With nothing selected, the details panel shows the tree (TreeTag, DisplayName, Nodes). With skills selected, it shows their Skill Definitions, so you can edit name, ranks, costs and grants without leaving the tree. Those changes are saved in the skill assets.
Toolbar
| Button | Description |
|---|---|
| Validate | Validates the tree and its skills and shows the Validation tab. |
| Docs | Opens this page (in PulseHUB if it is installed, otherwise in the browser). |
| Auto Layout | Places the skills in rows along their prerequisites with as few crossing connections as possible; the current left-to-right order is kept where it does not cause crossings. Comment boxes are fitted around the skills they contained. |
| Zoom to Fit | Shows all skills (also Home). |
| Comment | Adds a comment box (also C). |
| Minimap | Shows or hides the overview of the whole graph in the lower left corner. Click or drag in it to move the view. |
| Focus Path | Highlights the path to the selected skills (see above). |
A tree that was only filled in the details panel (all nodes at the same position) is laid out automatically when you open it.