Editor tools
The module PulseBuildEditor helps authoring pieces.
Piece workshop
Double click on a piece definition opens it in the piece workshop (the config workshop of the Pulse Editor Kit, see the editor kit page of PulseFoundation). It opens as a tree: the piece with its sections, placement, sockets, rules and traits on the left, the chosen list in the middle as cards with the values of the selection, the 3D preview and the live test on the right; a click on a socket in the preview selects it. Tree | Graph switches to the graph:
- the overview has a box per category (Piece, Look, Placement, Traits, …): the plain values of the piece as a section node, then its placement mode, sockets, rules and traits; the bar above the graph shows the name, category and mesh of the piece;
- a trait shows the lists inside it (costs, tiers, tier profiles) as chips; a double click on a trait opens the graph of the traits, one lane per trait with its costs and tiers; parts can be collapsed into a graph node of their own (Ctrl+G);
- the values of a node open inside the node, or show in the Details tab when the node is selected;
- the palette on the left lists every trait, rule, placement mode and cost; drag one into the graph or double click it to add it;
- the 3D preview on the right is the piece preview (below): selecting a socket node selects the socket in the preview and the other way round, and the gizmo moves the selected socket.
Socket nodes are named after the socket and show its type and what it accepts (“Wall · accepts Wall, Roof”). Tier entries and the tier profiles of the Integrity trait are named after their tier (“Tier 1: Stone”; entry 0 is tier 1, tier 0 is the piece itself). The Integrity trait and its tier profiles show a chart in the node: the stability of pieces resting on each other (up) and of pieces held from the side, from a piece on the ground down to the collapse threshold of the project settings, and in their summary how many pieces that allows (“9 pieces up, 3 sideways”). Point at the chart for the values. The plain values of the Placement category are the section “Placement Settings”, next to the “Placement” list of placement modes.
Custom permissions (Custom (Blueprint)) hold a Blueprint handler: its pin (or the Handler row in the Details tab) lists the Blueprints of UPulseBuildPermissionHandler and creates a new one next to the piece with Create New Blueprint…. Costs and conditions are the cards of PulseFoundation (Blueprint Cost, Blueprint Condition).
Creating pieces
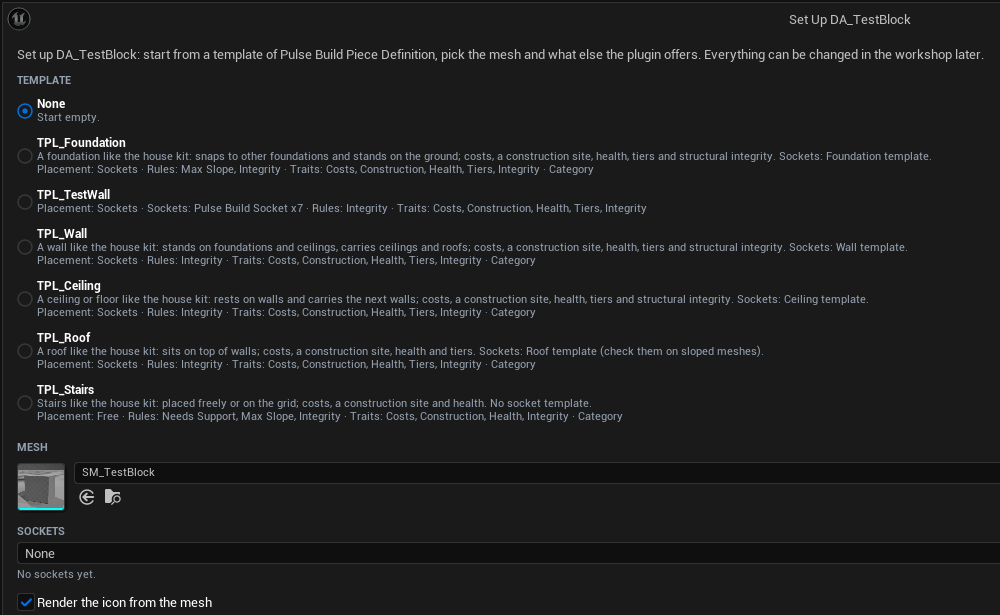
Add > Pulse > Build > Building Piece in the content browser (or New Building Piece in the Pulse window) creates a piece and opens it in its workshop with the creation wizard (a window next to it):
- Template: the templates of pieces, with their description and content. PulseBuild brings one per part of the house kit in
/PulseBuild/Templates(TPL_Foundation,TPL_Wall,TPL_Ceiling,TPL_Roof,TPL_Stairs): placement, rules, traits and the category of the kit piece, no sockets and no mesh. Templates you save from your own pieces (Templates > Save as Template in the workshop) are listed too. - Mesh of the piece.
- Sockets: a socket template of the socket generator (foundation, wall, ceiling, roof, pillar), sized from the bounds of the mesh. Picking a template suggests the one of its category (Walls: Wall).
- Render the icon from the mesh (see below).
Create sets all of it in one undo step and renders the icon. A static mesh in the content browser has Create Pulse Build Piece Definition in its context menu: it creates DA_<Mesh> next to it with that mesh and opens the wizard.
Live test
The Live Test tab next to the details of the piece workshop tries the piece out in the preview, with the same functions the game uses:
- Tier: the mesh, materials and health of a tier (tier 0 is the piece as defined).
- Construction and health: below 100 % built the piece shows its site mesh (Construction trait, tier 0); progress and health go to the custom data of the instance (0: progress, 1: health), so materials that read them (like
M_PulseBuild_Piece) look as in the game. - Spline (spline pieces only): the shape of the preview path (Straight, Curve, Slope), removing or adding a point (-, +, the other points stay), and whether the path keeps the limits of the piece, with the reason if not (see Spline pieces below).
- Docking test: pick a second piece; it attaches like in the game (
AttachToSocket, its socket facing the socket of this piece). A list shows every pair of sockets that fit (FPulseBuildSocket::Fits): click a row (or use the arrow keys) to see that pair; the socket of the pair is selected and the partner’s socket is marked. Clicking a socket of the piece in the preview shows its first pair, clicking it again its next pair. If nothing fits, the panel lists the socket types and what they accept on both pieces. - Reset Test shows the piece as defined again. The test changes nothing in the asset.
Per level
The tab of the live test has a second page, Per Level (the buttons at its top switch between them). It shows the piece on every difficulty level of the level provider (the levels of PulseDifficulty), computed like the game does, without a world:
- the cost lines of each tier:
Pulse.Tuning.Costof the level times the Piece Costs adjustments, or the other costs of a Replace (“other costs”); - Locked with the reason when a Lock Piece adjustment of the level locks the piece (the level name turns red);
- the build time (knob
Pulse.Tuning.Build.Duration) and the decay per hour (knobPulse.Tuning.Build.Decaytimes the Piece Decay adjustments, “also with paid upkeep” when one ignores it).
The first row is the piece without tuning. Without a level provider only that row shows. Below, Where Used lists the catalogs and other assets that use the piece, with a button that opens each. The tab follows changes of the piece while it is open.
Adjustments in the editor
The adjustments of pieces (see Construction) work with the tuning tools of the editor kit of PulseFoundation:
- Before and After of a Piece Costs adjustment applies it to a copy of the piece: Replace shows the other costs of the tier, a factor scales the amounts of Build Points and of the Items cost of PulseGameplay (rounded up like a payment); other cost types only change with Replace. Piece Decay scales
DamagePerHour. Lock Piece has no before and after; its effect panel shows the piece. - Numbers read through knobs show their value per level in tables and previews:
DamagePerHourof the Decay trait (Pulse.Tuning.Build.Decay),BuildTimeof the Construction trait and of each tier (Pulse.Tuning.Build.Duration). - Pulse Check and Validate Assets report adjustments whose piece is not set or does not load, a tier the piece does not have, a Replace without costs and a decay adjustment of a piece without the Decay trait (
Validateof the adjustment, run for presets and sources).
Catalog workshop
Catalogs (UPulseBuildCatalog) open in the same workshop. Their pieces are reference nodes: a thumbnail, the name, the category and mesh of the piece, linked with a dashed line (the piece is an asset of its own).
- Drag pieces from the content browser onto the + pin of Pieces, onto the catalog node or into the graph to add them; the palette lists every piece that is not in the catalog yet.
- Dropping a piece on a piece node replaces it; Delete removes the piece from the catalog (the piece asset stays).
- Double click a piece node to open the piece in its own workshop; the context menu also finds it in the content browser.
Piece preview
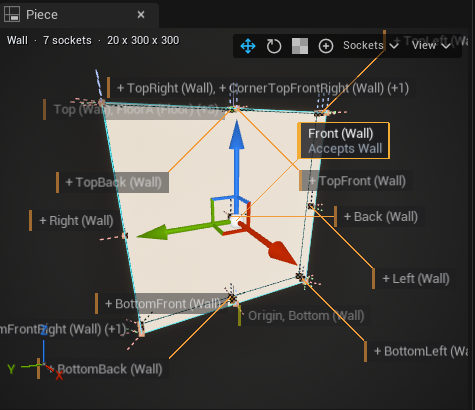
The piece workshop and the details panel of a piece definition show a 3D preview (the preview viewport of the Pulse Editor Kit): the mesh with its materials, the bounds as a box, the origin (bottom center) and every socket as an axis gizmo (X, red, points away from the piece) with its name and type. The top left corner names the piece, its socket count and the size of its bounds.
- Labels of sockets at the same place are grouped (“Top (Wall), FloorA (Floor) (+3)”) and open when you point at them; labels behind the piece are faded; the hovered socket shows what it accepts.
- Click a socket (or its label) to select it, then move it (W) or turn it (E) with the gizmo; each drag is one undo step. Sockets of the mesh (
bUseMeshSockets) can be selected but not moved. - The View menu shows or hides socket types, switches labels, floor, environment and grid, and picks a light preset. F frames the selected socket or the piece.
The preview updates while you edit. The camera stays where you put it; F frames the piece, and Reframe When the Content Changes in the View menu frames it after every change (off by default, saved for every Pulse preview).
Spline pieces (Spline trait) show a path instead of one mesh: the deformed segment mesh, the tiles and the point meshes with the materials of the tier, built with the same functions as the game. The points (P1, P2, …) can be moved with the gizmo (W). + Point in the toolbar of the preview (or Insert) adds a point after the selected one, halfway to the next point, or one segment past the end; the delete button (or Delete) removes the selected point (or the last one). A path keeps two points and at most MaxPoints; the other points stay where they are. The path is saved with the piece (PreviewSplinePoints, editor only, not cooked): each drag and each new shape, added or removed point is one undo step and marks the piece as changed, and the workshop opens with it again. Segments that break a limit of the piece (shorter than MinSegmentLength, steeper than MaxSlope, turning more than MaxTurnAngle into the segment) turn red, and the top left corner says which limit (the rule of CheckLimits). With connection tags, the ends show the ConnectRadius as faded spheres. The Spline part of the live test makes the path again in a shape; its - and + remove and add points like the toolbar.
Socket tools
Sockets do not have to be set one by one. The tools add them at typical places of the piece, always on request and with a preview first. They follow the convention of the house kit, so generated sockets work with its pieces right away: the origin is the bottom center, X of a socket points away from the piece and Z up, sockets on top and at the bottom point along +X of the piece (like Top and Bottom of the wall), corners point diagonally outwards. “Front” is +X (walls face +X), “Right” is +Y.
Generate Sockets
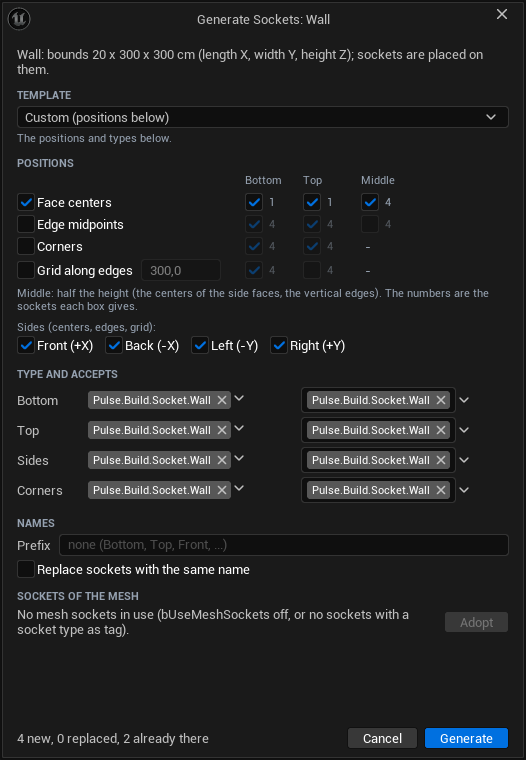
Sockets > Generate Sockets… in the bar of the preview opens the dialog next to the editor. It also opens from the context menu of the Sockets list in the workshop (the Placement section, a socket) and from the validation problem “socket placement without sockets” (Generate Sockets…).
-
Template: ready-made sets sized from the bounds of the piece, named like the house kit:
Template Sockets Foundation Edge0..3 (Foundation) in the middle of the bottom edges, WallBase0..3 (Wall) in the middle of the top edges Wall Bottom and Top (Wall), FloorA/B (Floor) and RoofA/B (Roof) in the middle of the top Ceiling Edge0..3 (Floor) at the bottom edges, WallBase0..3 (Wall) at the top edges Roof Bottom at the lower back edge, Ridge at the upper front edge (Roof); check them on sloped meshes Pillar Bottom, Top and the four sides, with the types of the groups below - Positions (template “Custom”): a table with a row per pattern and a column per height, Bottom, Top and Middle (half the height). Rows: face centers (Bottom, Top, the four side centers in the middle), edge midpoints (bottom and top edges, the vertical edges in the middle), corners (bottom and top) and a grid along the bottom and top edges (a socket in the middle of every cell; the cells are centered on the edge; the cell size is next to the row). The box in front of a row turns the pattern on; every cell shows how many sockets it gives, also while it is off. Each side can be left out (Sides below the table; vertical edges and corners always use all four).
- Type and accepts per group: Bottom, Top, Sides (side centers) and Corners (corners and vertical edges). They start with the socket type of the category (“Pulse.Build.Category.Walls” gives “Pulse.Build.Socket.Wall” when that tag exists); the choices are kept per category until the editor closes.
- Names: an optional prefix plus the name of the place (Bottom, TopFront, CornerTopFrontLeft, BottomFront_2).
- A socket at the same place (1 cm, 5 degrees) with the same type is not added again. With Replace sockets with the same name, a socket of the same name gets the new place and type; otherwise a new one gets a number. The line at the bottom counts what happens (“4 new, 0 replaced, 2 already there”).
- Sockets of the mesh: with
bUseMeshSockets, Adopt copies the mesh sockets as sockets of the piece (so they can be moved and changed) and turnsbUseMeshSocketsoff.
While the dialog is open, the sockets it would add show in the preview as faded ghosts (“+ Front (Wall)”) with dashed axes; they follow every change in the dialog and cannot be clicked. Ghosts have their own label groups, so a label never mixes sockets that are there with sockets that would be added. Generate adds them in one undo step; Cancel changes nothing.
Place on the surface
The + button in the bar of the preview (or P while the preview has the focus, or Sockets > Place on Surface) turns placing on. Point at the piece: a ghost shows the socket a click would add. It snaps to face centers, edge midpoints, corners and grid points within a tenth of the largest side (5 to 50 cm), otherwise it sits on the point. On a side, X points along the surface normal (level); on top and at the bottom, along +X of the piece. Type and accepts come from the groups of the dialog. A click adds the socket (one undo step) and selects it; where the same socket is already, the click selects that one. Click the button again or press Escape to stop.
Mirror
The context menu of a socket node has Mirror Front/Back and Mirror Left/Right: a copy on the other side, facing the other way. Front/Back or Left/Right in the name are swapped, a trailing A/B too (FloorA becomes FloorB), otherwise “_Mirror” is added. The entries are off when the copy would be a socket the piece has already (a socket on the mirror plane).
Icons and thumbnails
Piece assets show their Icon in the content browser; without an icon the mesh of tier 0 with its materials.
Render Icon (toolbar of the piece workshop, or the context menu of piece assets, also for several pieces) renders the icon from that mesh into T_<Name>_Icon next to the piece and sets it as Icon, in one undo step; rendering again updates the texture. Size, camera and background are in Project Settings > Pulse > Foundation > Icon Renderer (see the editor kit page of PulseFoundation).
Validation
IsDataValid checks pieces on save and with Validate Assets. In the piece workshop each problem sits on the node it belongs to (a socket, a trait, the section of a value) and a click selects that node; quick fixes are buttons next to the problem: remove an empty or doubled trait, add the Construction trait or pay at once, generate sockets or use the mesh sockets, add the Health trait to a decaying piece, clamp a value. The workshop also knows which traits belong together: Decay needs Health and the Integrity rule needs the Integrity trait (a warning with Add), Integrity, Construction and Tiers suggest the Integrity rule, Costs and Health (Fits With at the top of the palette, Add in the menu of the node).
The checks:
- neither a mesh nor an actor class;
- no mesh and no overridden bounds;
- sockets without a type, socket names used twice, socket placement without sockets;
- empty trait or cost entries, traits of the same type twice;
- payment stages without a construction site;
- decay without health.
Each message says what to change.